Using A Light Microscope:
How to (correctly) use a light microscope in the Science Classroom
1. Plug in the light microscope, as its a light microscope and needs a power source. [Always be aware that whenever you are working with electricity of any type, it is potentially dangerous]
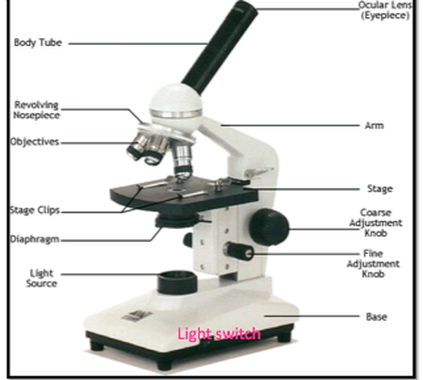
2. Turn the light switch on. The light switch is located on the bottom of the light microscope. When this button is pressed, light will come out of the light source. Note: Later to adjust brightness, you adjust the diaphragm that is located under the stage. It adjusts brightness by dispersing the light. But remember, this will be a tool to use later.
3. Now there are a few things to do before you can actually look through the eye piece. First completely lower the stage by adjusting the coarse adjustment knob. Note: For this step do not use the fine adjustment knob because it only moves the stage slightly whereas the coarse adjustment knob move the stage more profoundly.
4. Next select the objective lens with the least power by turning the revolving nosepiece.
5. Make a Wet Mount Slide
6. Now you're ready to put the slide on the stage- YAY! But before you go to the next step, make sure to NEVER to the following things during any part of the process:
-do not scratch the slide
-do not drop the slide (it is made of glass--> it will shatter)
-do not touch the slide with your oily fingers. so hold the slide on the edges.
7. Pick up your slide carefully. Make sure to NOT do anything mentioned in step 6.
Place it on the stage, but make sure to fasten it with the stage clips.
8. Now you are ready to look at the slide! So, look through the Ocular lens (a.k.a. the Eyepiece) that is attached to the Body Tube.
9. Get the specimen as clear as you can by turning the coarse adjustment knob. You may turn the Fine adjustment knob to tweak the clarity.
Focusing in on the Specimen:
Since you're using the lowest power objective lens, you may want to zoom in . Here's how.
1. Rotate the nosepiece to the next highest objective lens
Note: The levels of objective lenses are:
Scanning (4x)
Low (10x)
High (40x)
2. If needed use the fine adjustment knob to touch up the clarity
Finally, when you're done, clean up after yourself. And remember to move the microscope holding it with one hand under the base and another on the arm.
More of a visual learner?
Check out this video
How to correctly use a light microscope (medium-difficulty explanation):
Need more help? Click on the below button to access an interactive microscope:
©2012 by AyushiSinhaMicroscopy
